 Recently I taught my 6 year old's 1st grade class how to iris fold. First of all, I have to say it was crazy! We had 19 children and 3 adults. It was a pretty good ratio although I would recommend another adult if I did it again. I really simplified the folding for the kids. I numbered all of their paper strips beforehand. We had enough tape rolls that each pair of students had a roll. The hardest concept for them to grasp was the "edge" of the paper. I don't know how many times I said line up the "edge" of the paper with the lines while pointing to the "edge" and the lines.
I practiced with my 4 year old Kylie before I attempted it at school. She did a great job. (Of course, she has seen me iris fold for the last 4 years so she had a little bit of an advantage.) Still, I think she did a great job and I loved her drawing on the front afterwards.
I video taped her doing a simplified iris fold but deleted it from my camera after I downloaded it to the computer. I moved the video segments and now I can't open them. Hopefully I can revive them but if not, I will do another video. Kylie loves to iris fold so she won't complain.
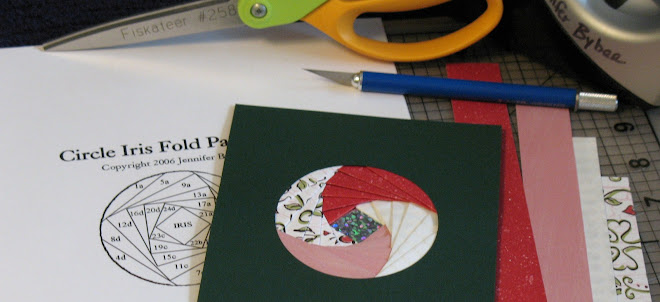
The computer I am on won't let me convert my instruction sheet to a PDF file. I am just going to post the instructions here and you can click on the pattern and print it up. I made mine 3 inches and used my Fiskars circle cutter to cut them out.
IRIS FOLD CIRCLE PATTERN
Instructions for younger children.
Material List
Template (3” circle cut from center of 8 ½” x 11” cardstock – save the page with the hole, not the circle)
Single Sided Tape (one roll for every 2 students)
4 Colors of Cardstock (11” x 1” strips)
Holographic or sparkle paper (1” square)
Extra materials in case some get lost.
Several extra sets of hands (1 adult per 4 or 5 children)
Parent’s/Teacher’s Instructions:
Tape template to paper with pattern
Cut each paper strip in 4 - two 3” strips and two 2 ½ ” strips
Number strips following the color pattern, starting with the 2 longer strips of each color first.
Have children tape paper pieces, face down, to template following the number order.
Tape the holographic paper, face down, over the iris.
Child can turn over and decorate the front side of his/her paper when he/she is done folding.
I strongly recommend practicing this technique before teaching it to children.
For a demonstration of iris folding, you can watch this video.

Color Pattern:
Color 1: 1, 5, 9, 13
Color 2: 2, 6, 10, 14
Color 3: 3, 7, 11, 15
Color 4: 4, 8, 12, 16
Child’s Instructions:
Please listen to your teacher give instructions.
You are working on the back side of your picture so your paper strips should face down.
Tape your paper strips in the same order that you count 1 to 16.
Line up the edge of your paper strips along the lines and tape on both sides.
Tape your glitter paper over the “iris” when you are done taping all of your paper strips.
By the way, for those who follow my sporadic blog postings, our daughter Kylie has almost fully recovered from her horse accident. She only has some minor hearing loss.


2 comments:
Hi Jen, What wonderful instructions and your video is great.....not monatone at all..I have bookmarked this and also the video...I'm really gonna try this and if I master it I will try to teach my granddaughters..thanks so much for the inspiration..I still enjoy looking at my Nifty Fifty tags!!
Thanks Jen for the instructions! This will be a fun craft for the girls.
Post a Comment